
- PS给冬季外景人像添加雪景特效
PS给冬季外景人像添加雪景特效
作者:小麦skin来源:部落窝教育发布时间:2017-12-21 11:30:40点击:3617
版权说明: 网络作品,转载请注明原作者和出处。
编按:
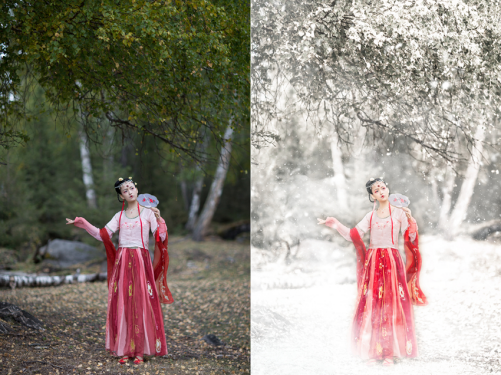
要想拍出大片一样的雪景照片首先你要能抗寒,如果你实在怕冷还可以用Photoshop实现下雪场景。本教程教大家用高斯模糊的杂色模拟雪,在简单的进行调色,一张古风照片就完成啦~
(1)色温往蓝色调整,减低饱和度。使整个颜色偏青一些。增加曝光度,使画面更干净。压暗高光,提高阴影呈现一些细节。

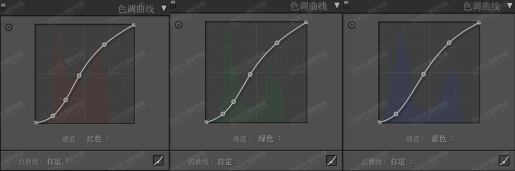
(2)曲线调整,增加暗部和亮部的对比度。
(4)调整分离色调,这里调整它的高光部分,根据自己的喜好而定。
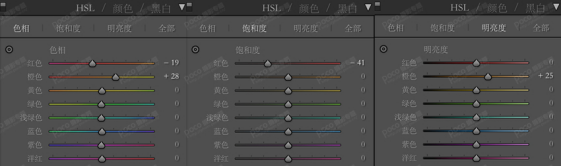
(5)调整相机校准,加红原色的绿原色,减蓝原色,为了使画面中的黄色更加饱满。

Lightroom定调后,我们进入Photoshop液化精修。

PS处理大致有三个步骤:第一步,对整体氛围的渲染,先对素材简单的修饰,把雪天的氛围渲染出来;第二步,调色,把整体调成统一的冷色;第三步,增加雪花。
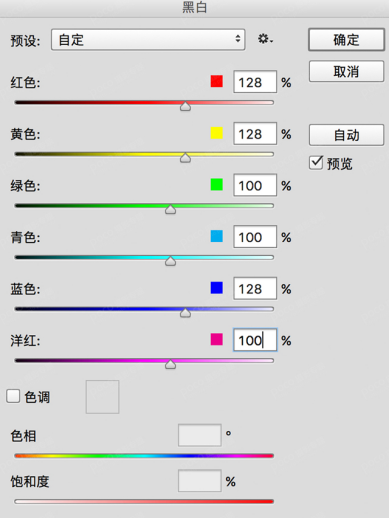
(1)复制图层,液化磨皮,图像-调整-黑白,设置如图,确定后把混合模式改为“滤色”。建立蒙版,把人物擦出来。

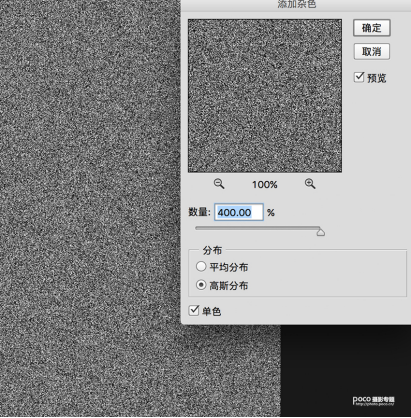
(2)新建一层“雪花层”,填充黑色。执行滤镜-杂色-添加杂色,400px高斯分布,单色,点击确定。执行滤镜-模糊-高斯模糊,7px,确定即可。
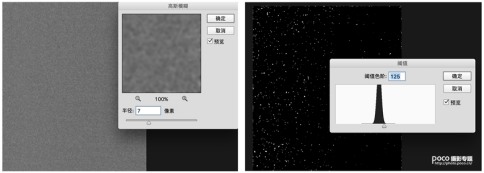
(3)图像调整-阈值,值为125,这样就产生了随机的白色颗粒化效果。
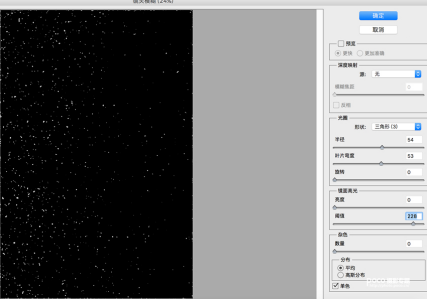
(4)滤镜-模糊-镜头模糊,选择三角形,勾选更快,形状选择三角形,数值分别为:54/53/0;0/288/0;勾选平均分布以及单色,点击确定,就可以出现大雪花的形态。到这一步,将“雪花层”颜色模式改为滤镜,ctrl+j复制一层,强化大雪花的效果。
(5)可以在雪花落下的下方,用画笔涂抹淡淡的白色,产生雪花弥漫的效果,或者是做背景模糊,会让雪景更加丰富有立体感。加雪花素材,打造更梦幻的雪景。
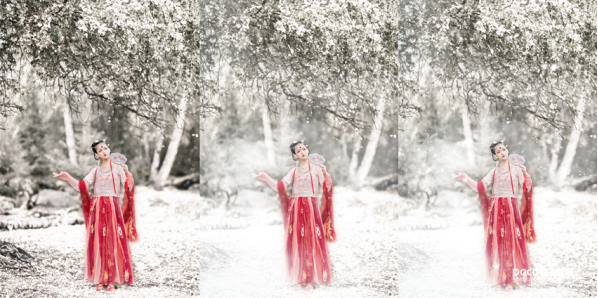
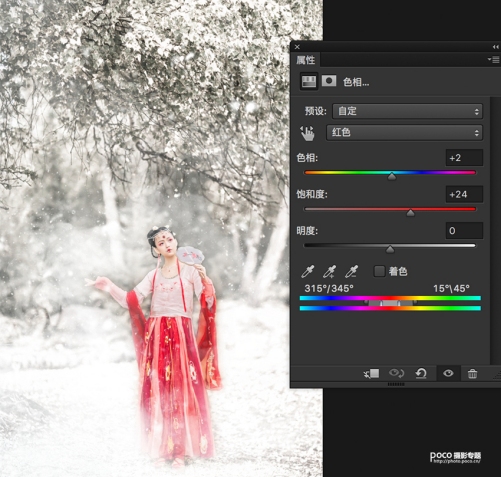
(6)调整-色相饱和度。红色加饱和24,让衣服的颜色衬托雪景,更加温暖。
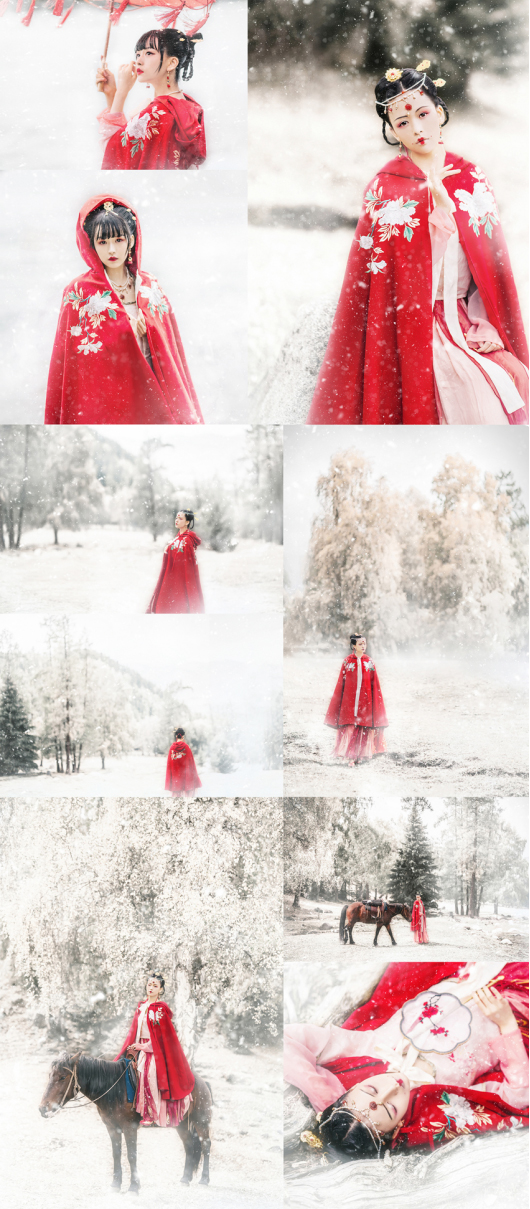
我们最后来看一下对比效果图,如有疑问或交流可以给我留言,微博@小麦Skin。
原文:南方孩子也可以拍!没有雪的雪景人像
作者:小麦skin
出处:http://photo.poco.cn/special_topic/topic_id-26606-p-1.html#content_hash
要想拍出大片一样的雪景照片首先你要能抗寒,如果你实在怕冷还可以用Photoshop实现下雪场景。本教程教大家用高斯模糊的杂色模拟雪,在简单的进行调色,一张古风照片就完成啦~
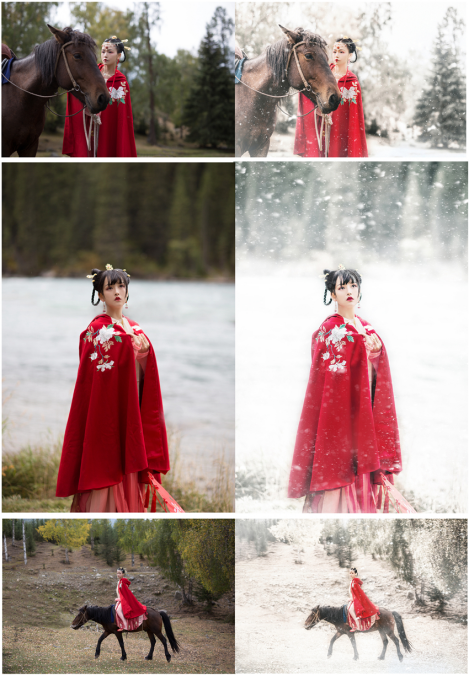
原片分析,背景灰暗,不够干净,层次不分明。后期要往雪景方向调整,呈现仙气的感觉。
(1)色温往蓝色调整,减低饱和度。使整个颜色偏青一些。增加曝光度,使画面更干净。压暗高光,提高阴影呈现一些细节。
(2)曲线调整,增加暗部和亮部的对比度。
(3)红色和橙色决定肤色,降低红色饱和,让皮肤看起来颜色适中。
(4)调整分离色调,这里调整它的高光部分,根据自己的喜好而定。
(5)调整相机校准,加红原色的绿原色,减蓝原色,为了使画面中的黄色更加饱满。
Lightroom定调后,我们进入Photoshop液化精修。
PS处理大致有三个步骤:第一步,对整体氛围的渲染,先对素材简单的修饰,把雪天的氛围渲染出来;第二步,调色,把整体调成统一的冷色;第三步,增加雪花。
(1)复制图层,液化磨皮,图像-调整-黑白,设置如图,确定后把混合模式改为“滤色”。建立蒙版,把人物擦出来。
(2)新建一层“雪花层”,填充黑色。执行滤镜-杂色-添加杂色,400px高斯分布,单色,点击确定。执行滤镜-模糊-高斯模糊,7px,确定即可。
(3)图像调整-阈值,值为125,这样就产生了随机的白色颗粒化效果。
(4)滤镜-模糊-镜头模糊,选择三角形,勾选更快,形状选择三角形,数值分别为:54/53/0;0/288/0;勾选平均分布以及单色,点击确定,就可以出现大雪花的形态。到这一步,将“雪花层”颜色模式改为滤镜,ctrl+j复制一层,强化大雪花的效果。
(5)可以在雪花落下的下方,用画笔涂抹淡淡的白色,产生雪花弥漫的效果,或者是做背景模糊,会让雪景更加丰富有立体感。加雪花素材,打造更梦幻的雪景。
(6)调整-色相饱和度。红色加饱和24,让衣服的颜色衬托雪景,更加温暖。
我们最后来看一下对比效果图,如有疑问或交流可以给我留言,微博@小麦Skin。
对比效果
原文:南方孩子也可以拍!没有雪的雪景人像
作者:小麦skin
出处:http://photo.poco.cn/special_topic/topic_id-26606-p-1.html#content_hash